Heirloom Tomato Salad with Feta & Oregano Flowers

DSC_0243-1-710With the local tomatoes still in season, heirlooms from Millstone Farms and beefsteaks from Roden Farms, why not showcase this summer delicacy with another great Tomato Salad recipe. This one comes from our friend Katie, The Parsley Thief , and it’s a sure-fire healthy hit!
From the Parsley Thief’s post:
As I mentioned a few posts ago, we haven’t had much luck with our heirloom tomatoes this year, as I planted them in a location that’s not getting enough sun to ripen them. Well, since then, we got two ripe ones! In addition to that I got a big bowl of garden goodies from my mother…about a dozen big tomatoes, a few peppers & some of her delicious homegrown garlic. Then yesterday, a neighbor stopped by with a few of her tomatoes & a red bell pepper. So, I had a huge abundance & this is what I decided to make with some of them.
Growing up, my mother & my grandmother used to make summer salads with big chunks of tomatoes & cucumbers, or peppers, sprinkled with lots of garden oregano. It’s still, to this day, one of my most favorite salads.
Normally, I am not a huge green bell pepper fan. That is, unless they’re homegrown. Something about the thin-skinned garden variety tastes so much better to me than store bought. It’s not just me either…the Bozo’s have been eating them for the past week, sliced in their lunch boxes.
This recipe is my interpretation of my family’s classic. It’s flexible & if you don’t have green peppers from a garden, I recommend using red, yellow, or orange ones instead…or, you can substitute cucumbers also. Right now, my oregano plant has gone to flower. I love oregano flowers. Not just in an arrangement, because they are so sweet looking…but, because they have tons of flavor & look just as pretty on a plate as they do in a vase.
DSC_0081-1a-341
DSC_0146-1-710
DSC_0132-1a-710

Begin with 2 pounds of ripe assorted heirloom tomatoes & 1 large bell pepper {I used 2 small ones instead}. Cut the tomatoes into medium sized uneven chunks. I sliced some of them & cut some into chunks. Seed the pepper & cut into bite sized pieces.
Place the tomatoes into a large colander & sprinkle them with a few pinches of kosher salt. Give them a gentle stir & then another pinch, or two, of salt. Let them sit for 15 minutes.
Next, you will need some garlic, fresh oregano, 1 1/2 ounces of feta cheese & some oregano flowers {if you can manage to find some}.
Mince one clove of garlic. Add it to a small bowl, along with 1 tablespoon of minced oregano & 1 tablespoon of white balsamic vinegar. Whisk to combine. Slowly add in 2 tablespoons of extra virgin olive oil, while whisking, to form an emulsion.
Cut the feta into small pieces.
DSC_0176-1-341DSC_0171-1-341
DSC_0243-1-710

Gently combine the peppers & tomatoes. Arrange them on a serving platter & sprinkle with the diced feta. Drizzle the dressing over the salad, garnish with the oregano flowers & serve.

Heirloom Tomato Salad with Feta & Oregano Flowers

Serves 4
Oregano plants begin flowering in late summer. If you grow oregano, or can manage to find some oregano flowers, they are packed with flavor & look beautiful sprinkled on top of this salad. White balsamic vinegar is milder than traditional balsamic & will not effect the color of the salad, as the traditional would. If you cannot find it, you can substitute some white wine vinegar.

Salting the tomatoes before arranging the salad helps draw out some excess moisture & really intensifies their fresh tomato flavor.

2 pounds assorted ripe heirloom tomatoes
1 large bell pepper {any color}, seeded & cut into chunks
kosher salt
1 clove garlic, minced
1 tablespoon minced fresh oregano
1 tablespoon white balsamic vinegar
2 tablespoons extra virgin olive oil
1 1/2 ounces feta, cut into small bits, or crumbled
oregano flowers, for garnish
Begin my slicing the tomatoes into medium sized, uneven chunks. I like to vary the shapes, large dicing some of them & slicing others. Place them into a large colander & sprinkle them with a few pinches of kosher salt. Give them a gentle stir & then another pinch, or two, of salt. Let them sit for 15 minutes.
In a small bowl, combine the garlic, minced oregano & vinegar. Whisk to combine. Slowly add the olive oil, while whisking, to form an emulsion.
Gently combine the peppers & tomatoes. Arrange them on a serving platter & sprinkle with the diced feta. Drizzle the dressing over the salad, garnish with the oregano flowers & serve.
Click here for the printable recipe.

Grilled Thai Shrimp with Garlic Sauce

Thai-Grilled-Shrimp-with-Garlic-Sauce_edited-1This week, our friend Jeanette shares her delicious and easy  summer Grilled Shrimp recipe. Nothing better that fresh shrimp on the grill. This recipe has minimum prep with a surprise Thai taste twist. We’ve halved the the soy sauce and oyster sauce to make it a healthy dish without sacrificing flavor.
Grilled Thai Shrimp with Garlic Sauce
Prep Time: 20 minutes
Cook Time: 8 minutes
Serves 4
Ingredients 
1 pound jumbo shrimp (Jeanette prefers white shrimp), shells on
Garlic Sauce 
2 tablespoons soy sauce
2 tablespoons oyster sauce
1 tablespoon fish sauce
2 tablespoons brown sugar
8 cloves garlic, minced
1 tablespoon lemon juice
1/8 teaspoon cayenne pepper
Directions 
Using a sharp knife, carefully butterfly shrimp, cutting shrimp through the shell (start just above the tail, and cut through the middle of the shrimp until you reach the end) and removing the vein. Flatten shrimp with the palm of your hand. The shrimps should lie flat. Mix Garlic Sauce ingredients together. Marinade shrimp in Garlic Sauce for 20 minutes. Lightly oil a large piece of aluminum foil. Place shrimp in a single layer on top of foil. Grill until just cooked through, flipping shrimp halfway through cooking, about 3-4 minutes per side.
Jeanette Chen, a resident of New Canaan for 20 years, is the busy mom of 4 boys and author of a popular health and wellness food blog, Jeanette’s Healthy Living. She was recently nominated for Best Health Blog by Healthline and is always looking for ways to make healthier meals for her family and friends.
See more by clicking here.

Pesto Pasta Salad with Grilled Chicken by The Parsley Thief

katie_pestopastasalad“As promised, more from Cooks Illustrated ’30 Minute Meals’ mag. How could I resist making this meal? It’s perfect in every way. It’s has all of your typical dinner food groups, all in one bowl. It can be served warm, room temperature, or cold. It tastes delicious the day of, or days after. It’s simple, nutritious & quick. Then, the sugar on top…everyone in my family will eat it!  If you’ve never served pesto to your kids & you’re not sure how they will like it…this is a great start. As, this particular recipe for pesto is pretty mild. It contains more nuts than typical versions & less garlic. Not like the pesto I am used to, but so good!” Katie, The Parsley Thief
Begin by cooking 1 pound of Campanelle pasta in a large pot of salted water. I love using Campanelle, or bell flower shaped pasta…especially, for pasta salads, as it’s such a pretty shape & holds dressings, or sauces very well. But, you can use whatever pasta you have on hand. Cook the pasta about 1 minute less than al dente. The pasta will absorb the dressing & swell. So, it’s best to under-cook it. Drain & rinse under cold water. Set aside for now.

For the pesto dressing, grate a 1/2 cup of Parmesan cheese & toast a 1/2 cup of pignolis {pine nuts}. I put them in the toaster oven, at 350 degrees, for about 5-7 minutes, or until golden brown. Watch out, because they have a high oil content & will burn very quickly.

Next, measure a {packed} 1/2 cup of fresh basil leaves. Add all of these ingredients to the bowl of a food processor, along with the juice of 1 lemon & 1 coarsely chopped garlic clove. Blend until smooth. Then, with the motor running, slowly add 2/3 cups of extra-virgin olive oil & process until incorporated.


Rinse & trim 1 whole boneless, skinless chicken breast. Then slice them down the middle, so that you have 4 thin pieces of chicken. Drizzle them with 1 tablespoon of extra-virgin olive oil & season generously with salt & freshly ground pepper. Grill for about 3-5 minutes per side {depending on how thin they are}, or until they are cooked through. Transfer to a cutting board & cut into thin slices.

Transfer the pasta to a large bowl. Halve 1 pint of cherry tomatoes & throw them in, along with 2 ounces of baby arugula. Add a splash of the dressing, just to loosen up the pasta & toss to combine.

Add in the sliced chicken, pour on just enough dressing to moisten the salad to your liking, toss & serve.

Pesto Pasta Salad with Grilled Chicken

Adapted from Cooks Illustrated, “30 Minute Suppers”, Summer 2010
Serves 4
Note: I love using Barilla’s Campanelle pasta for pasta salads, as it’s a pretty shape & holds dressings very well. But, any pasta can be substituted for it…Penne, Fusilli, Farfalle, etc.
1/2 cup toasted pine nuts
1/2 cup freshly grated Parmesan cheese
1 clove garlic, coarsely chopped
1/2 cup {packed} fresh basil leaves
juice of 1 lemon
2/3 cups + 1 tablespoon extra-virgin olive oil
1 whole boneless, skinless chicken breast
salt & pepper, to taste
1 pound Campanelle pasta
1 pint cherry tomatoes, halved
2 ounces baby arugula
Bring a large pot of salted water to a boil. Cook the pasta, according to the package instructions, until 1 minute less than al dente. Drain & rinse under cold water.
Meanwhile, combine the pine nuts, Parmesan cheese, garlic, basil & lemon juice in the bowl of a food processor. Blend until smooth. With the motor running, slowly add the 2/3 cups olive oil & process until incorporated.
Rinse & trim the chicken breast. Then slice them down the middle, so that you have 4 thin pieces of chicken. Drizzle them with the remaining tablespoon of olive oil & season generously with salt & freshly ground pepper. Grill for about 3-5 minutes per side {depending on how thin they are}, or until they are cooked through. Transfer to a cutting board & cut into thin slices.
Combine the pasta, tomatoes, arugula & sliced chicken in a large bowl. Add a bit of the dressing at a time & toss, until the salad is well coated with the pesto. You may not need all of it {If making ahead of time, or you end up with some leftovers, save the dressing to re-hydrate the salad later on}.
Check the salad for seasoning & serve.
Click here for the printable recipe.

Watermelon Margaritas by The Parsley Thief

pic1_watermelonmargaritaThe now-closed, Ocean Drive, in SoNo, used to make the most amazing watermelon margaritas in the summertime. Lately, I have been dreaming of one & decided to try to re-create them at home. These margaritas are very similar to the classic ones I make, in that they are real margaritas…and not some sickeningly sweet frozen concoction. If you are looking for something sweet, by all means, add some simple syrup, or superfine sugar to these & it should suit your taste.
Watermelon Margarita
Adapted from the Food Network
Serves 4
Ripe seedless watermelon, cut into 1″ cubes (about 3-4 cups)
2 limes, juiced
4 ounces good quality white tequila
2 ounces orange flavored liqueur (Cointreau or Grand Marnier)
Ice (2-3 cups)
Watermelon wedges, for garnish
Fill half a blender with the cubed watermelon. Add about 2 cups ice.
Add the tequila, liqueur, and lime juice. Blend until watermelon is pureed & the ice is crushed.
In a serving glass, pour the margarita over ice & garnish with a wedge of watermelon (if desired).
Note: If your watermelon is not particularly sweet you can add some simple syrup, or superfine sugar to the blender.
Click here for the printable recipe.
Begin by filling half your blender with some cubed, ripe watermelon.
pic2_watermelonmargaritapic3_watermelonmargarita
Add in about 2 cups of ice, the juice of 2 limes, 6 ounces of good-quality white tequila & 2 ounces of Grand Marnier, or Cointreau. Blend & serve over ice, with a wedge of watermelon.
pic4_watermelonmargarita
pic5_watermelonmargarita
pic6_watermelonmargarita

pic7_watermelonmargarita

A bit about Katie, The Parsley Thief:
Being a mom of two boys, her blog, The Parsley Thief, focuses on family friendly, made-from-scratch recipes. The Parsley Thief has been named one of “50 Food Blogs You Should Be Reading” by Saveur magazine and was named one of the top 100 Mom Food Blogs by the family website, Babble.

Elia’s Blueberry-Apricot Clafoutis Recipe

photo-1083“In the summer, I find myself bringing a favorite dish to potlucks, or carrying a picnic dinner to the park, concerts, the beach… it’s great to have a few simple, crowd-pleasing dishes that will travel well up your sleeve,” says Johnson.  This month, she shares one of her favorite summer desserts with Walter Stewart’s shoppers. “This clafoutis recipe is really easy, and really versatile,” says  Eila Johnson, The Full Plate Blog. “I recently made it with blueberries and apricots, but you can use any fruit that’s in season, and you can serve it warm or room temp. Both kids and adults love it, and it just take a few minutes to assemble. My kind of recipe!”
Simple Blueberry-Apricot Clafoutis
(Makes 8 servings)
1 pint blueberries*
4 apricots, pitted and cut into 8 pieces each*
4 eggs
¾ cup sugar
1 cup whole milk (Stewart’s carries local Arethusa milk!)
2 Tablespoons vanilla
¾ cup all-purpose flour
pinch of salt
Preheat oven to 350. Butter an 8” baking dish or pie plate. Arrange the fruit in a single layer in the baking dish. In a blender, or using a hand-mixer, combine eggs, sugar, milk, vanilla, flour and salt. Pour the batter over the fruit. Bake for 45 minutes – 1 hour, or until the top is golden brown and the custard is firm (when a knife inserted in the center comes out clean). Sprinkle with powdered sugar and serve warm or room temp.
*You may substitute 3 cups of your favorite fruit. Traditionally, clafoutis is made with cherries. I’ve also had it with pears, or raspberries. It’s delicious any way you make it!
photo-1080
photo 3-59
photo 1-85
photo 2-85
photo 1-86
photo 3-60

photo-1082
Busy New Canaan mom, Eila Johnson, writes the full plate blog. The site, which was named to Forbes’ 2012 Top 100 Sites for Women, Forbes’ Top 10 Parenting and Homemaking Sites, and was ranked in the Top 5 “Foodie Mom Blogs” on a major parenting site in both 2012 and 2013, teaches busy parents how to make simple, nourishing recipes for their families and friends.

Jeanette’s Strawberry Spinach Salad Recipe

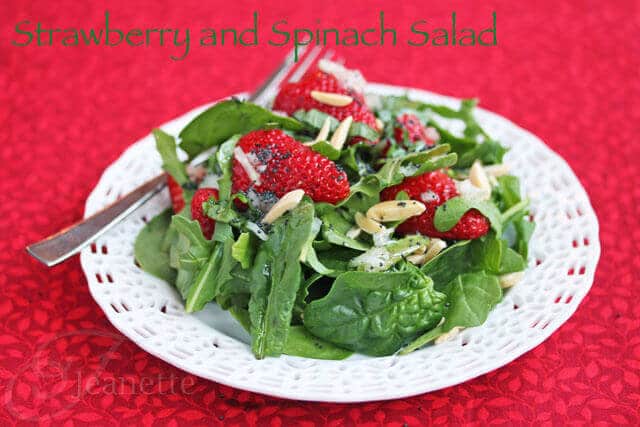
This week we chose a seasonally-appropriate recipe from Jeanette Chen (Jeanette’s Healthy Living) .  . . “With fresh strawberries coming into season (Walter Stewart’s had its first delivery of native Strawberries from Pell this week and will continue to receive deliveries of CT Strawberries throughout June), I immediately thought of making a traditional Spinach Strawberry Salad with a Poppy Seed Dressing. I first had this salad a number of years ago and was instantly hooked. This is an easy salad to make for a crowd as there are just a few ingredients in the salad itself. (Walter Stewart’s just received a fresh delivery of Local CT Bunched Spinach from Cecarelli Farm in Northford).
Strawberry Spinach Salad with Poppy Seed Dressing Recipe
Ingredients
Salad
8 large handfuls of baby spinach, washed
2 pints fresh strawberries, halved
1/2 cup slivered almonds, toasted
Dressing
1/2 cup olive oil
1/4 cup raspberry, apple cider or rice vinegar
1/4 cup honey
2 tablespoons sesame seeds
1 tablespoon poppy seeds
1 teaspoon minced onion
1/4 teaspoon Worcestershire sauce
Directions
Toss Salad ingredients together in a large salad bowl.
Whisk together Dressing ingredients. Drizzle lightly over salad just before serving.
Jeanette Chen, a resident of New Canaan for 20 years, is the busy mom of 4 boys and author of a popular health and wellness food blog, Jeanette’s Healthy Living. She was recently nominated for Best Health Blog by Healthline and is always looking for ways to make healthier meals for her family and friends.

Grilled Chicken, Bell Pepper, Zucchini & Squash Kebabs

Grilled-Chicken-with-Vegetables-KebabsJeanette Chen, a resident of New Canaan for 20 years, is the busy mom of 4 boys and author of a popular health and wellness food blog, Jeanette’s Healthy Living. She was recently nominated for Best Health Blog by Healthline and is always looking for ways to make healthier meals for her family and friends. This week Jeanette shares a lunch hit with her boys. With the summer coming, this fresh and quick dish is a crowd pleaser.

Ingredients

  • bamboo skewers

Chicken

  • 3 pounds boneless chicken breast, cut into 1 inch cubes
  • 2 lemons
  • 1/4 cup extra virgin olive oil
  • 4 sprigs rosemary or 2 teaspoons dried oregano, rosemary, thyme or a mixture
  • salt and freshly ground pepper

Vegetables

  • Assorted bell peppers (I used red, yellow, orange)
  • Zucchini
  • Summer Squash

Chimichurri Sauce
Chimichurri Sauce is good on just about anything – chicken, fish, or grilled vegetables. My kids will eat just about anything with this sauce. Mix all ingredients together.
Ingredients

  • 4 tablespoons minced parsley
  • 4 tablespoons minced onion
  • 1 minced garlic clove
  • 4 tablespoons extra virgin olive oil
  • 1 tablespoon fresh lime juice
  • a dash or two of ground cumin salt and pepper to taste

Directions

  1. Place chicken in a large bowl. Add lemon, olive oil, herbs, salt and pepper. Let marinate at least one hour and up to overnight.
  2. Cut peppers into 1″ pieces. Cut zucchini and summer squash into 1/2″ thick pieces that are about 1″ inch wide (I cut semi-circles for the larger pieces).
  3. Soak bamboo skewers for 30 minutes before grilling.
  4. Skewer chicken and vegetables, alternating chicken and vegetables.
  5. Grill until done.
  6. Serve with Chimichurri Sauce, if desired.